지금부터 실제 url에 있는 데이터를 가져와 python에서 결과를 받는 작업을 진행한다.
Jekyll Themes
jekyllthemes.org
위 페이지는 static webpage로 미리 정의된 html 및 css를 사용하여 고정된 콘텐츠를 표시하는 웹페이지이다.
개인 블로그, 포트폴리오 사이트, 기업 소개 등 변화가 적고 간단한 웹 사이트에 주로 사용된다.
정적 웹 크롤링에는 3단계로 진행 된다.
1단계. 원하는 웹 페이지의 html문서를 싹 긁어온다.
2단계. 긁어온 html 문서를 파싱(Parsing)한다.
3단계. 파싱한 html 문서에서 원하는 것을 골라서 사용한다.
이제 시작하기 전 두 가지 라이브러리를 설치하도록 한다.
pip install requests
pip install bs4
python에서 url에 접근하여 작성된 html 코드를 읽으려면 다음과 같이 사용한다.
import requests

response = requests.get("http://jekyllthemes.org/")
response.status_code
결과로 200이 나올 것이고 이 전에 API에 대해 사용해 봤다면 어렵지 않은 내용일 것이다.
API에 대해 사용해 본 적이 없다면 status_code 200은 정상적으로 결과를 받았다는 의미이다. 만약 잘 못 된 주소를 입력하면 404로 올 것이고 이는 주로 봤던 Page Not Found를 의미한다.
위 코드에서 추가로 reponse.text 를 입력한 뒤 실행해보자.
import requests

response = requests.get("http://jekyllthemes.org/")
response.status_code
response.text
'<!DOCTYPE html>\n<html>\n<head>\n <meta charset="UTF-8">\n <title>Jekyll Themes</title>\n <meta name="viewport" content="width=device-width, initial-scale=1">\n <link href="http://fonts.googleapis.com/css?family=Playball" rel="stylesheet">\n <link href="/assets/css/jekyllthemes.css" rel="stylesheet" />\n <link href="/assets/css/syntax.css" rel="stylesheet" />\n</head>\n\n\n<body>\n\n\n\n <script>\n (function(i,s,o,g,r,a,m){i[\'GoogleAnalyticsObject\']=r;i[r]=i[r]||function(){\n (i[r].q=i[r].q||[]).push(arguments)},i[r].l=1*new Date();a=s.createElement(o),\n m=s.getElementsByTagName(o)[0];a.async=1;a.src=g;m.parentNode.insertBefore(a,m)\n })(window,document,\'script\',\'//www.google-analytics.com/analytics.js\',\'ga\');\n ga(\'create\', \'UA-735643-13\', \'jekyllthemes.org\');\n ga(\'send\', \'pageview\');\n </script>\n\n\n\n <header id="header">\n <div class="wrap">\n\n <h1 id="logo"><a href="/">Jekyll Themes</a></h1>\n\n </div>\n </header>\n\n\n\n <div id="pagecontainer" ...위와 같은 결과로 길게 나올텐데, 위에서 접속한 http://jekyllthemes.org/ 페이지의 html 코드를 가져온 것이다.
이 작업이 1번에 해당하는 웹 페이지의 html 내용을 가져오는 것이다.
해당 페이지에 접속하여 'F12'를 눌러 Dev tool을 열고 Elements(요소)로 이동하여 webpage의 html 코드를 볼 수 있다.
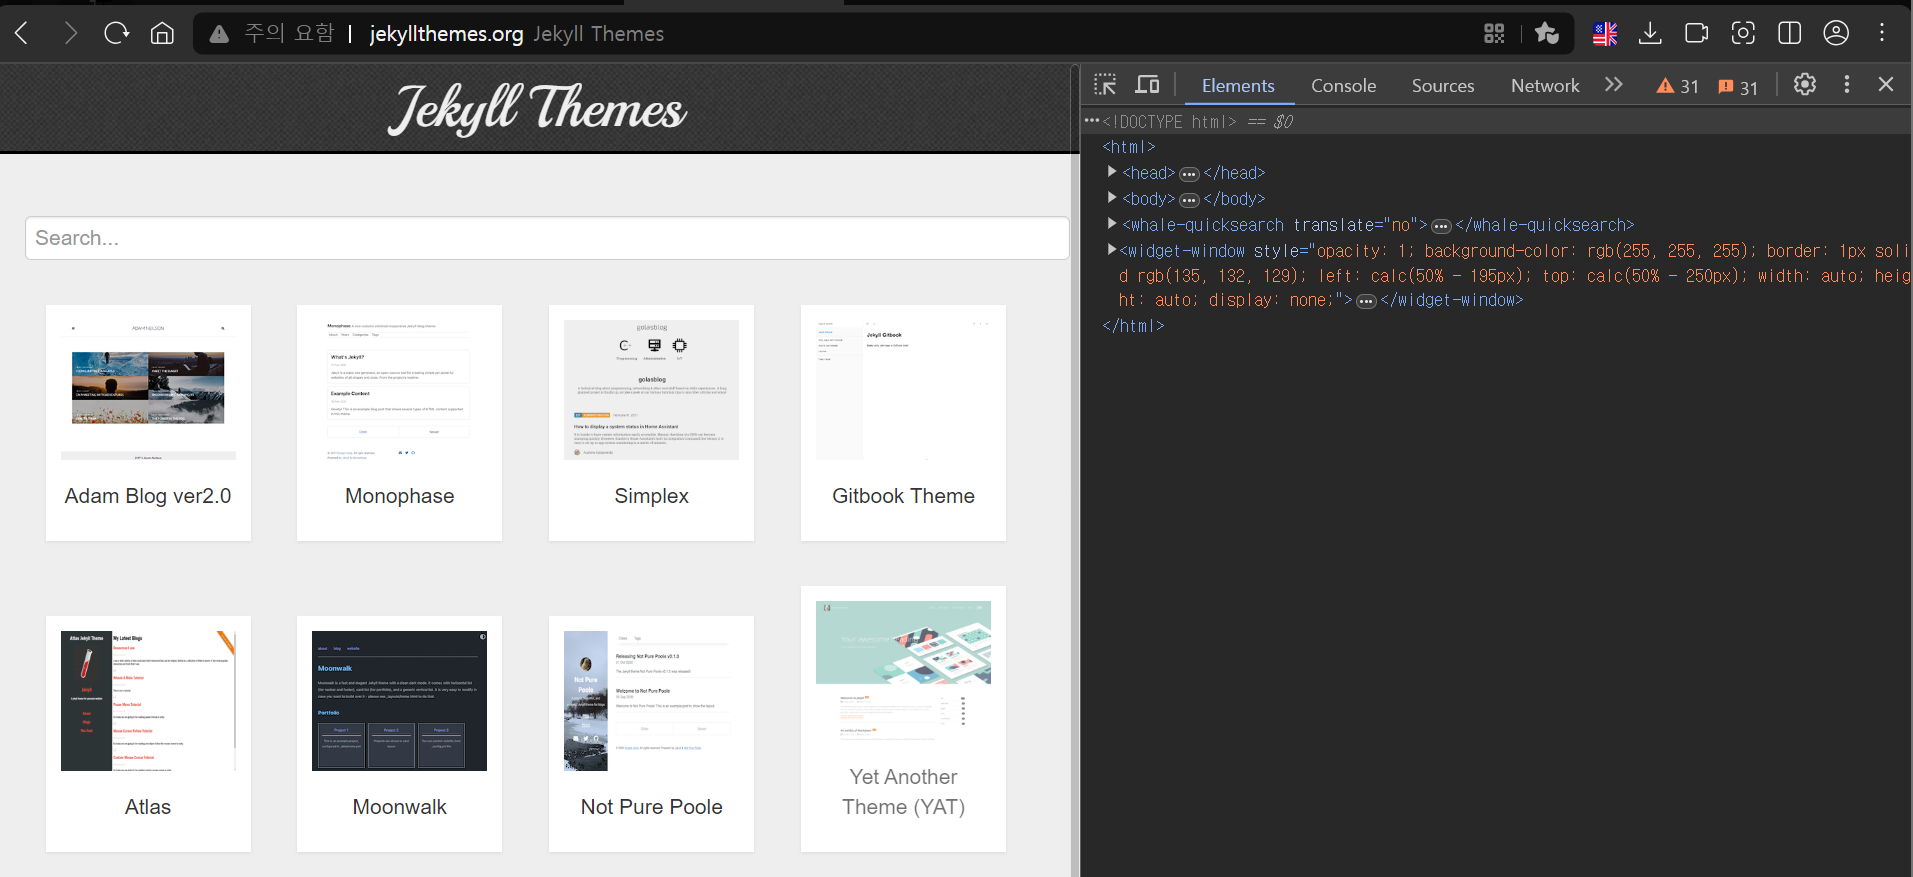
우측의 elements로 작성된 내용이 reponse.text로 가져온 부분이다.
이제 아이템을 가져오는 작업을 진행해보자.
import requests
from bs4 import BeautifulSoup

response = requests.get("http://jekyllthemes.org/")
html = response.text
soup = BeautifulSoup(html, 'html.parser')
soup.select_one(".item-name")
위와 같이 작성하고 실행하면 <div class="item-name">Adam Blog ver2.0</div> 을 받을 수 있다.
.item-name은 class 이름이 item-name에서 가져온다는 것이고 #item-name을 사용하면 id가 item-name인 것에서 가져온다는 의미이다.
select_one은 여러개의 중복된 내용이 있어도 첫 번째에 있는 아이템의 값을 가져오도록 한다.
이 작업에 html 문서를 파싱(parseing)하는 것과 아이템을 가져오는 내용까지 간단하게 포함되었다.
html에서 임의의 아이템을 구분해서 가져오는 것이 익숙치 않다면 다음 링크에서 제공하는 퀴즈를 풀어봐도 좋다.
CSS Diner
A fun game to help you learn and practice CSS selectors.
flukeout.github.io
화면에서 움직이는 이미지만 고르는 방법을 작성하면 된다.
예를 들어 1번 문제의 답은 plate 이다. CSS Editor 1번 줄에 써 주면 된다.
다음의 이미지에서 첫 번째 item에 대한 몇 가지 데이터를 가져오는 연습을 할 것이다.
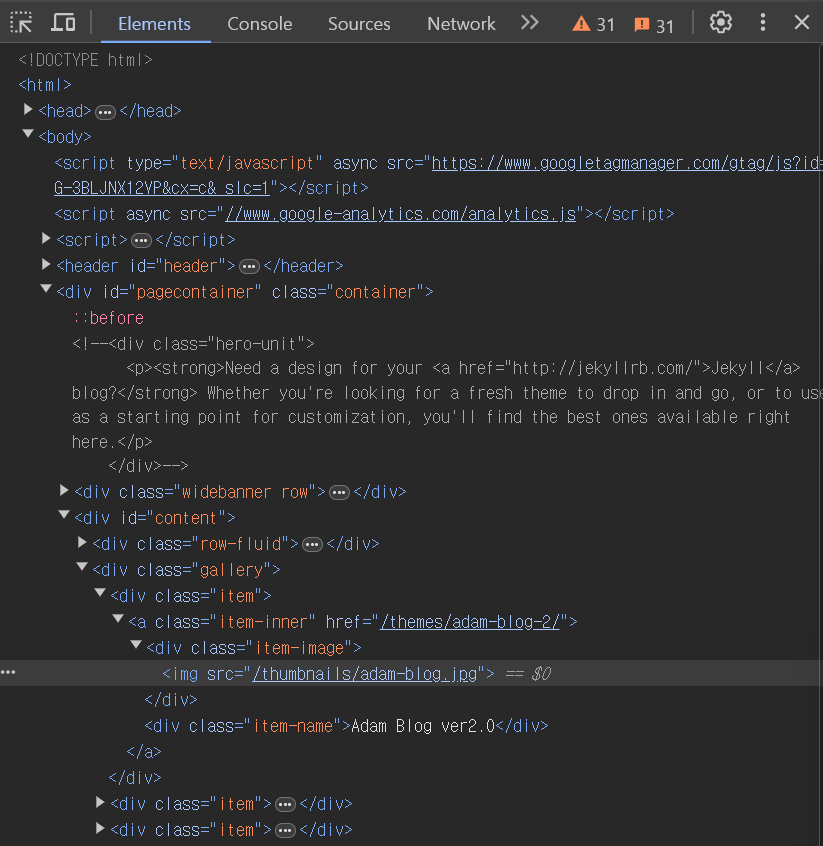
soup.select_one(".item-inner").text
# '\n\nAdam Blog ver2.0\n'
soup.select_one(".item-inner").text.strip()
#'Adam Blog ver2.0'
soup.select_one(".item-inner").attrs['href']
# '/themes/adam-blog-2/'
위에서 이미 item-name을 받아오는 작업을 진행했었다. 이 코드에서 하나씩 결과를 확인해 본다.
이렇게 여러개의 item 중 첫 번째에 해당하는 item들을 가져와보았다.
하지만 item-image class 하위에 있는 class도 정의되어있지 않고 id도 없는 <img src="..."> 에 대한 값은 어떻게 가져와야 할까?
soup.select_one('.item .item-image img')['src']
# '/thumbnails/adam-blog.jpg'
soup.select_one(".item-image img")['src']
# '/thumbnails/adam-blog.jpg'
이와 같이 가져올 수 있다.
그러나 나처럼 html 및 css에 익숙하지 않다면 앞으로 이런 item을 가져오는게 너무 어려울 것이다.
이것을 쉽게 할 수 있는 방법이 있다.

html에서 원하는 아이템에서 우클릭 -> Copy -> Copy selector를 선택하면 된다.
#content > div.gallery > div:nth-child(1) > a > div.item-image > img그러면 이렇게 <img src="..."> 에 대한 위치 값이 나온다.
soup.select_one("#content > div.gallery > div:nth-child(1) > a > div.item-image > img")
# <img src="/thumbnails/adam-blog.jpg"/>
soup.select_one("#content > div.gallery > div:nth-child(1) > a > div.item-image > img")['src']
# '/thumbnails/adam-blog.jpg'
이렇게 결과를 얻을 수 있다.
만약 html 코드가 너무 복잡해서 화면에 있는 item이 코드 중 어디있는지 찾기 어렵다면, Elements 옆옆에 있는 점선으로 된 네모와 오른쪽 귀퉁이에 화살표로 된 버튼을 사용할 수 있다.

"Select an element in the page to inspect it" 이라고 설명이 되어있는이 버튼이다.
단축키는 Windows 기준으로 "Ctrl + Shift + C"이다.
이 것으로 화면에서 원하는 아이템을 선택하면 html 코드에서 매칭되는 코드를 알려준다.

마우스를 올려다 놓으면 이렇게 회색 블록으로 처리되고, 선택하면 해당하는 html 코드가 선택된다.
이렇게 하나의 아이템을 가져오는 방법에 대해서 알아보았다.
다음에는 여러개의 아이템을 가져오는 방법에 대해 알아보자.
다음으로
[Python] 파이썬으로 크롤링하기 part.5 (여러 페이지에서 많은 아이템 가져오기)
이전과 같은 페이지인 http://jekyllthemes.org/ 에서 아이템을 반복해서 가져오도록 한다. Jekyll Themes jekyllthemes.org 접속 후 F12를 눌러 dev tool의 Elements로 이동한다.이렇게 무수히 많은 item들이 있는데
haku-s.tistory.com
'Python > Crawling' 카테고리의 다른 글
| [Python] 파이썬으로 크롤링하기 part.6 (네이버 자동 로그인 후 메일 보내기 with selenium) (0) | 2024.08.01 |
|---|---|
| [Python] 파이썬으로 크롤링하기 part.5 (여러 페이지에서 많은 아이템 가져오기) (0) | 2024.08.01 |
| [Python] 파이썬으로 크롤링하기 part.3 (html, css 이해) (0) | 2024.07.31 |
| [Python] 파이썬으로 크롤링하기 part.2 (오토 마우스, 오토 키보드) (0) | 2024.07.31 |
| [Python] 파이썬으로 크롤링하기 part.1 (설치 및 준비) (0) | 2024.07.31 |


